We wrapped up week 1 of 3 (haha...sure) of online We wrapped up week 1 of 3 (haha...sure) of online learning and we’re all losing it a little. Things that are helping: pretending that we’re in the Mystery Machine, headed for a campground with a mystery to solve! Jude says the camp counsellor is pretending to be a ghost while Luca was busy getting “Honey” into her sleeping bag for the night. And then a pirate showed up, so this story is really getting good 😂

@playmobil is honestly a life changer because the kids get to build AND use their imagination. It’s a win-win, and let’s face it, we could all use a little win these days.

How are you all coping with kids at home?
Why yes, this is exactly what my dining room table Why yes, this is exactly what my dining room table looks like right now. No, there aren’t markers, papers, toys, food, crumbs and tears on it. Nope. Nope. Nope. None of the above. Everything’s cool and calm over here, folks.

(If it’s not abundantly clear, I am joking.)
What does your Monday morning look like today? We’re over here prepping for online learning (note computer on dining room table) and I’m using our @playosmo to get our kids engaged in some math and language activities before we really get going. Every time I post about our Osmo, I’m asked: “do you really like it?” And my answer is always “YES!” I mean, just look at these kiddos. Jude is obsessed with the tangram and Luca loves sounding our words - he was trying to figure out whether to use ‘k’ or ‘c’ for ‘cat’ here. To them, they’re “playing”...but we all know what’s REALLY going on! #unboxingosmo #osmosocialclub
Well it would seem that I just CANNOT figure out r Well it would seem that I just CANNOT figure out reels, but I’m not letting that stop me. I made one showing you the materials and steps to make this super easy ornament storage so would you go watch it, pretty please?

I’ve been using this method of ornament storage for 7 years and it all started with a cardboard box, some red cups and a single layer. A few years later I upgraded the system to multiple layers, used foam board and white cups and voila! Scroll over to see what I mean.

Would you try this? It’s super easy and you can probably still go ahead and just use old cardboard and whatever cups you have on hand. It’s the best thing I ever did for my holiday decor!! Just make sure you use double sided tape or hot glue to attach the cups - loose cups are no bueno!

If you do this, show me, ok? I wanna see everyone put away their ornaments with no breakage! 🙌
Ready for lots of THIS over the next couple of wee Ready for lots of THIS over the next couple of weeks...but with a puppy in the middle of it all. We’re picking up Taco on Friday so prepare yourself for puppy pictures ALL over the place.

Also: I’ve been feeling uninspired lately and have taken a little break from both posting and consuming when it comes to social media. I’m trying to soak up the holiday magic, read things other than captions (as I write this that seems weird), and even writing more things down.

This time of year always makes me reflective - less because it’s the end of a calendar year and more because it’s my birthday in 9 days. Yes. It’s on the 25th. Yep. Christmas Day. No, seriously. Yeah, Christmas baby! I don’t mind it now, but I didn’t like it as a kid. Oh you know someone who also has a birthday on (or very close to) Christmas! Cool! <— that was just me reacting to like every single conversation ever about having a birthday on December 25th. 😂
I’m still thinking about these adorable little @ I’m still thinking about these adorable little @tubicenlighting lamps that you just touch to turn on and off. And this cutie little door all decked out with a smart doorbell and lock. And the beautiful blue kitchen by @remodelcanada.ca. And all of the vanities from @canaromatoronto. And this gorgeous hardwood flooring from @coswickcanada.ca.

Can you believe this was all under one roof? @improvecanada has 350 showrooms and it was so much fun seeing how many we could get to yesterday.

I’ll be sharing lots more about @improvecanada in the coming months, but if you’re curious and want to go see it for yourself, they’re open! You can call and book an appointment or even have a customer service rep help you make an appointment at showrooms suited to what you’re looking for. Pretty great, right?
#improvecanada # ad #makeitright
So I made a thing and I’m totally in love!! Now So I made a thing and I’m totally in love!! Now I just need to gather all of the boys for an adorable family photo. Christmas miracle, maybe?

I made these sweaters for all of us last weekend using my @officialcricut Joy and now I may need to start personalizing a LOT more shirts around here! It was my first time using infusible ink and I love how the sweaters stays super soft! I may just be wearing this for the rest of the year!

O.S. If it wasn’t clear, our last name is Murray 😆

Have you made matching Christmas sweaters? What would be on yours if you did? # ad #cricutmade
Are you crafty? Do you know someone who is? Or may Are you crafty? Do you know someone who is? Or maybe you’re like me and you like to think you’re crafty but lack the patience to take out a whole bunch of things to make one tiny craft? Well then I have the thing for you. Meet the @officialcricut Joy! It’s tiny but mighty, and you can just have it casually sitting on a shelf waiting to be used when inspiration strikes because it takes up basically no room at all! I made these labels using mine, and you can swipe to see another easy project you can make with a Cricut Joy. It’s the perfect little gift! I even wrote a blog post about why I think so. I’ll share another Cricut project with you later this week!! # ad #cricutmade
Can you believe this room was completed two years Can you believe this room was completed two years ago? And I still love it as much today as I did then. And I still believe that my kids can have a fun, comforting space even if they don’t get to decorate it themselves with superhero bedding and Lego everywhere! But ALSO, I would never judge you if you’re that parent who does let your kids decorate with all the primary colours because you do you, boo and if it makes you and your kids happy, I say do the dang thing!!!

Ok that is all. Have a wonderful judgement-free day!
  • Home
  • About
  • Contact
  • Privacy Policy
  • Home
  • About
  • Contact
  • Decor
  • DIY
  • Life

The Learner Observer

Decor • DIY • Lifestyle

  • Home
  • Decor
    • One Room Challenge
    • Thrifting
  • DIY
  • Life
    • Food/Drink
  • Holidays

Decor, DIY, Sponsored · October 27, 2015

A Quick Entryway Makeover with DIY Shiplap Walls

Let me start by saying sorry to my email subscribers for the random “Gg”-titled email a few days ago. I accidentally published a post that just had two random pictured for another post in it. Don’t even ask me how that happened… I promise today’s post is real!

Sponsored Post

Yes, we are making over the nursery. Yes, you may know we’ve also started renovating our bathroom (more on that Monday morning). Yes, we also did a small makeover in our entryway because I am a crazed pregnant woman whose idea of nesting is completing ALL of the not yet completed/started projects we ever planned around the house. Blame it on the fact that we’re having twins and I’m afraid we wouldn’t get to any of these things for at least another 3 years if we didn’t do them RIGHT NOW! I obviously have the world’s most patient husband, who comes home from a long day of work to appease me by completing tasks from the 3 to-do lists
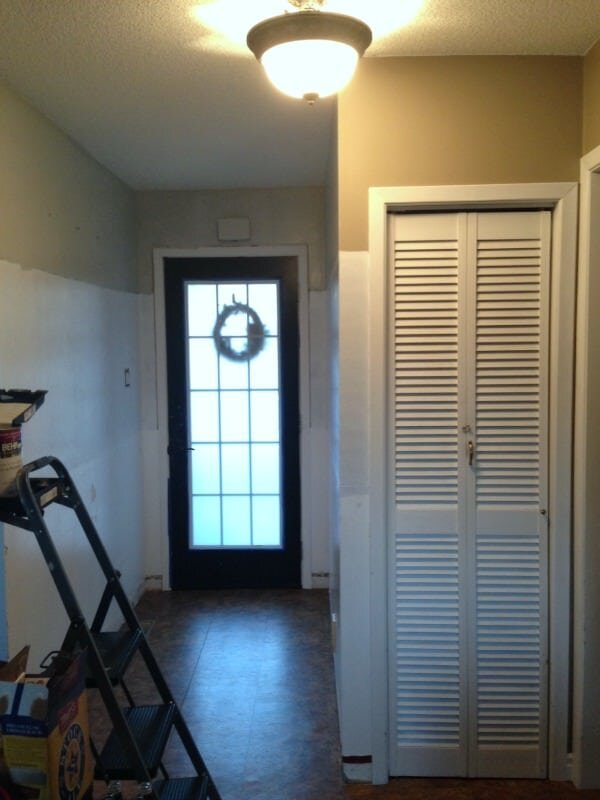
 we I have on the go.

Now let’s get to the actual makeover!

Entryway makeover with faux shiplap and a DIY picture ledge

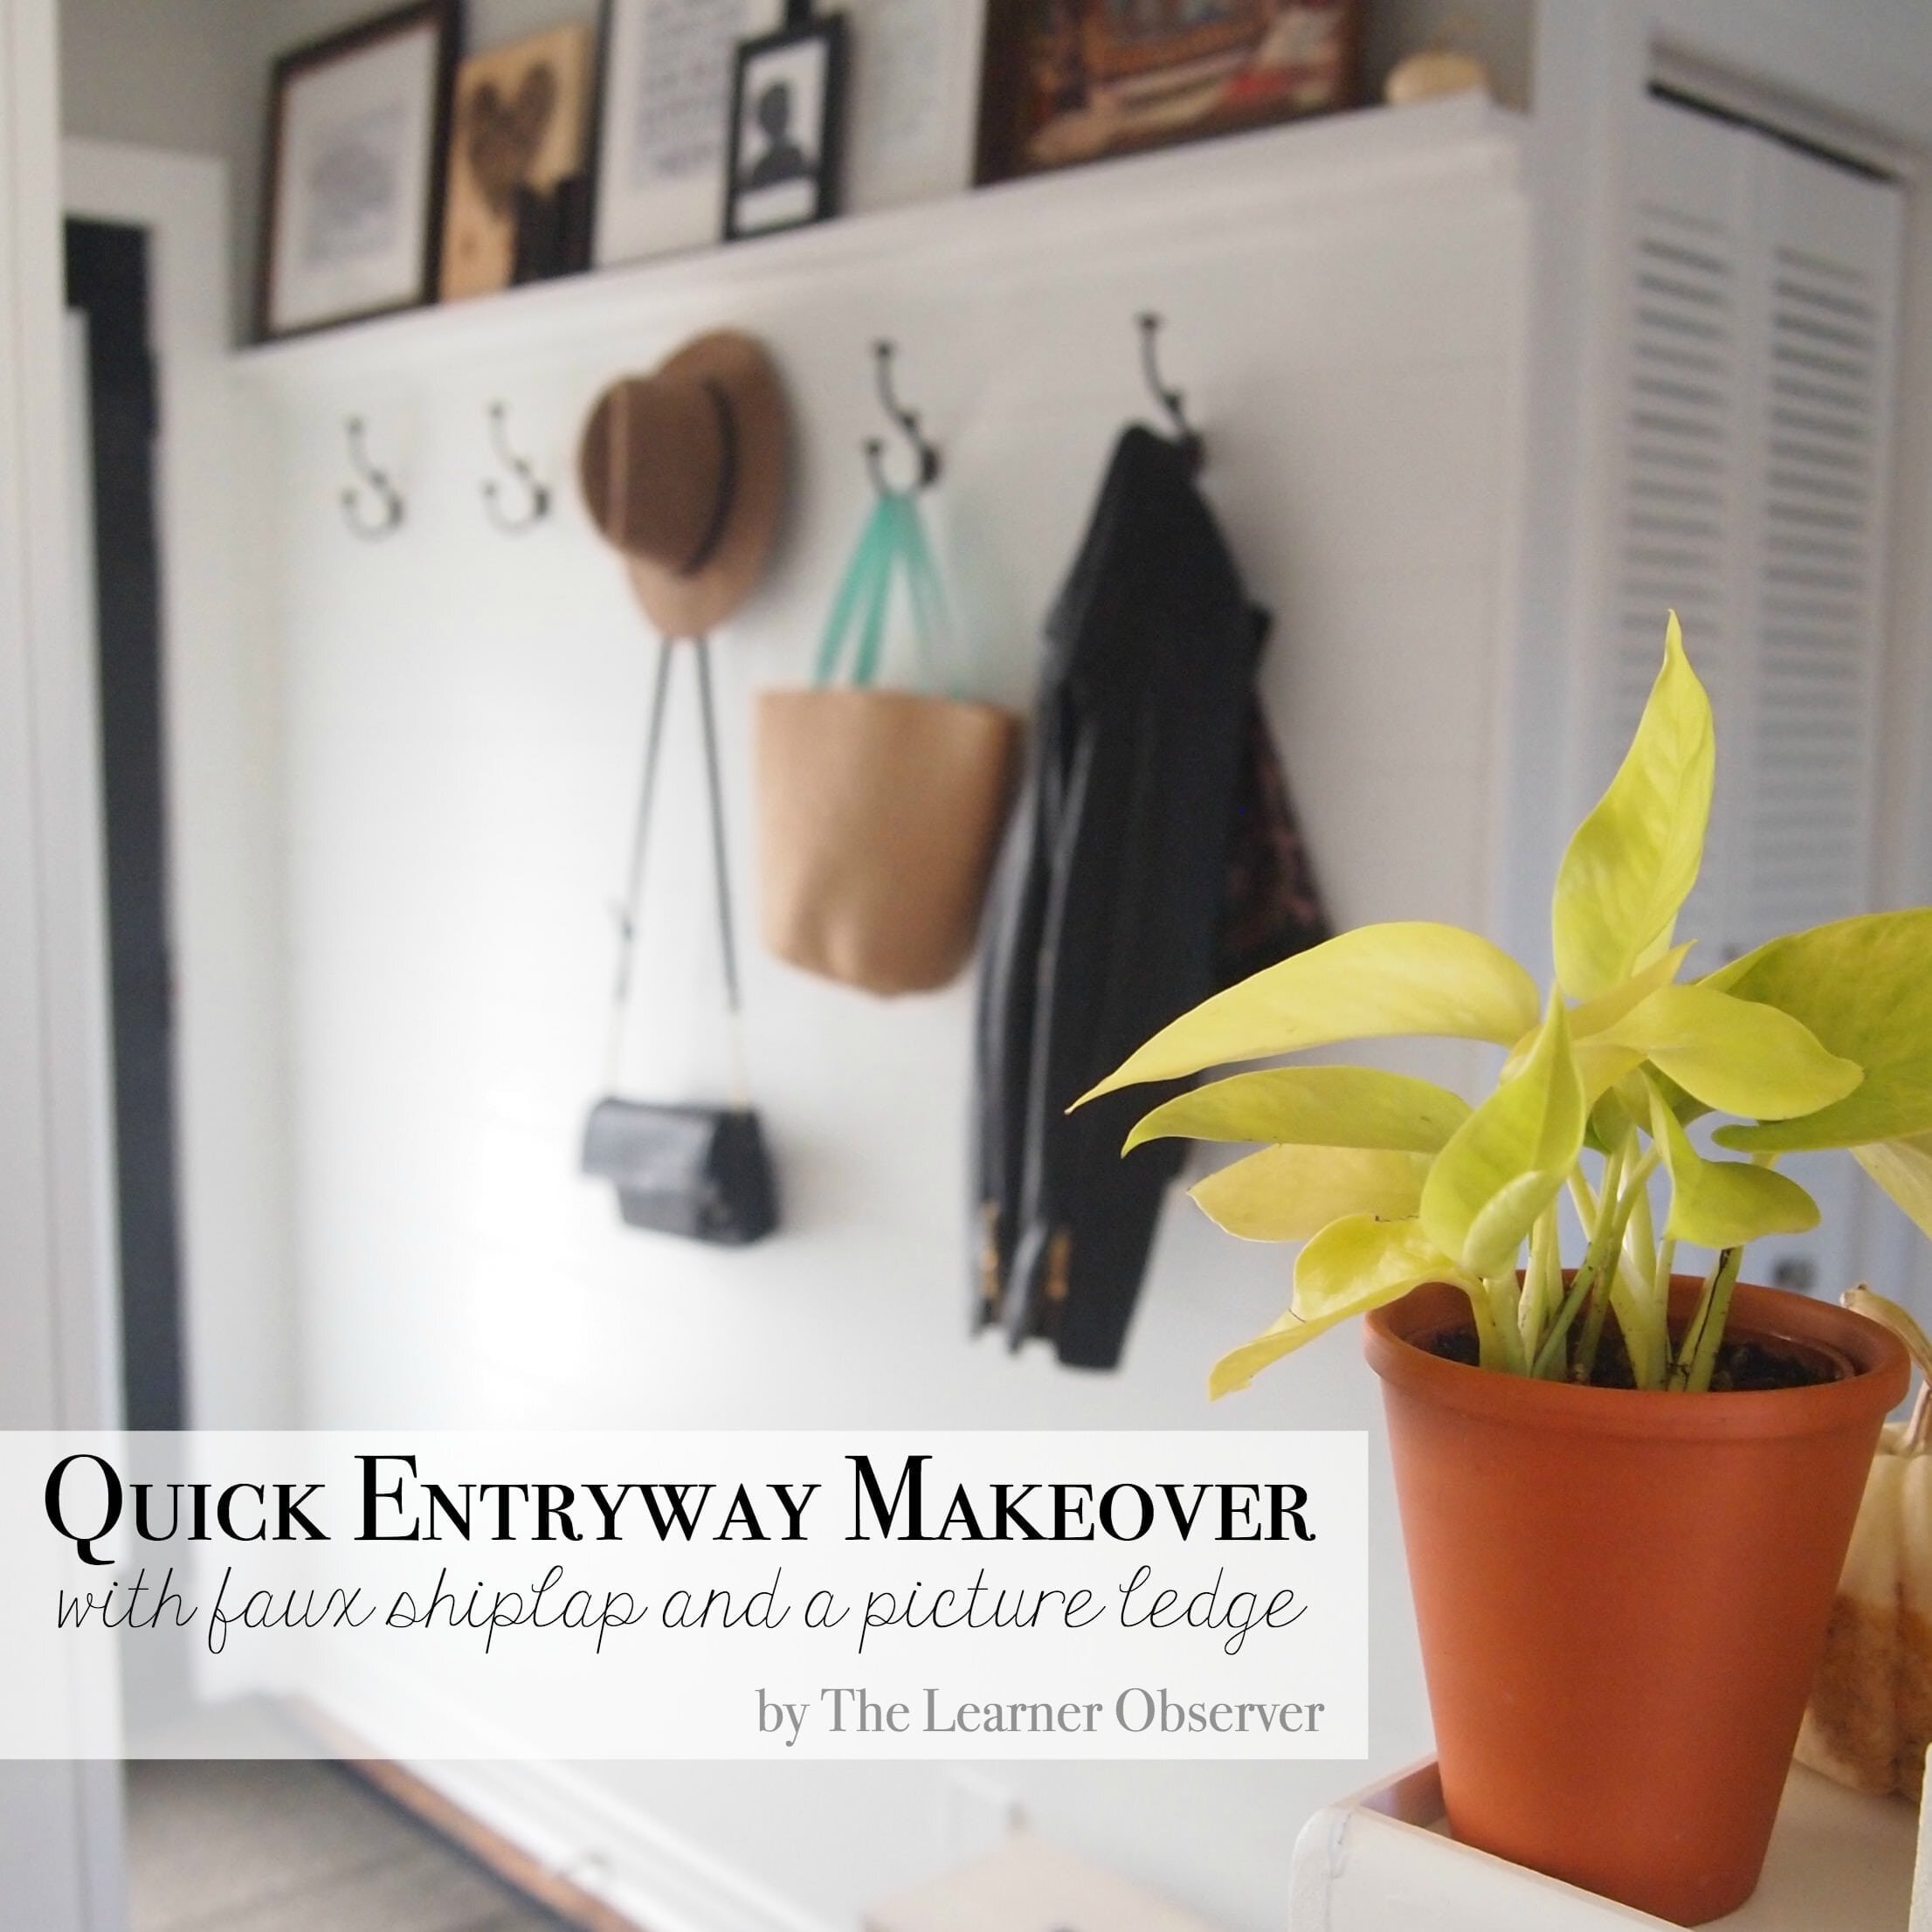
The entry to our house is small and a bit cramped. It’s just a basic hallway, and we don’t really have a dedicated closet, either – just a huge walk-in closet/pantry that we don’t really like to open up to our guests because it’s a bit awkward and we store a LOT of stuff in there, so it’s not pretty. Here’s what I’m talking about:

entry before

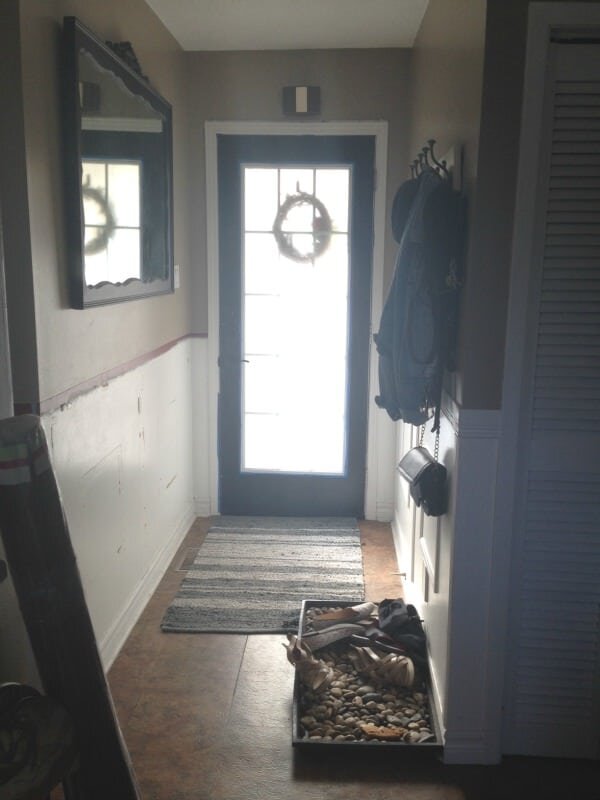
The plans for this space included removing the fake trim work on the bottom. It is SO poorly done and consists of random pieces of baseboard and other trim. I also hate that taupe colour, which is unfortunately the colour of our entire main floor living space – but that’s going to change soon, according to the to-do list!

entry before 2

We also wanted to change out the ugly boob light. Our house was FILLED with boob lights, and we have been slowly replacing them all (I think we have 4 left).

I considered some really simple flush mounts, but this is the entry – the first impression our house makes to our guests, and because our main floor is so small, this space is very visible, so I really wanted to have something that would provide great light (needed in a tight hallway) and look good doing it! I started by looking through Parrot Uncle’s flush mount ceiling lights, and there were a lot to choose from. You can also click here for more chandelier ceiling lights, since some of these aren’t exactly a flush mount. These were some of my clear favourites:

Parrot Uncle Lighting Choices

1 – 2 – 3 – 4 – 5 – 6

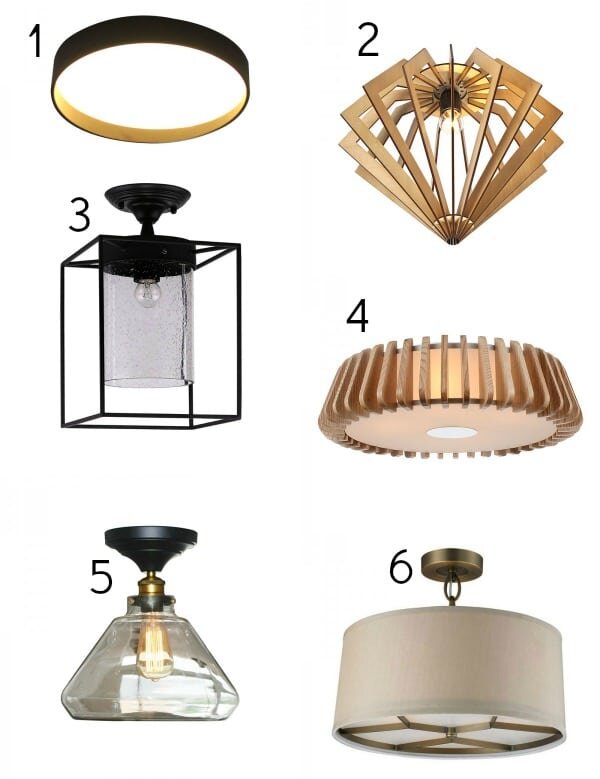
So which one did I choose? Keep reading to see!

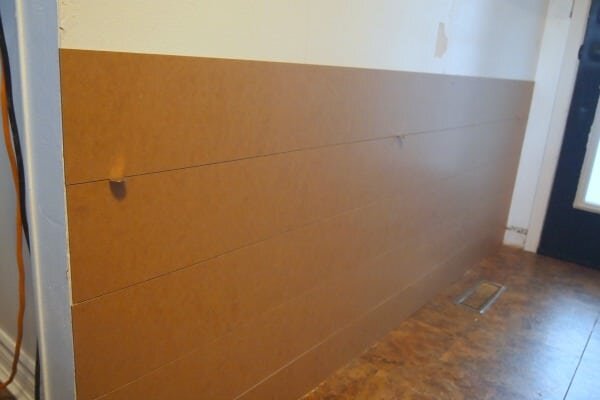
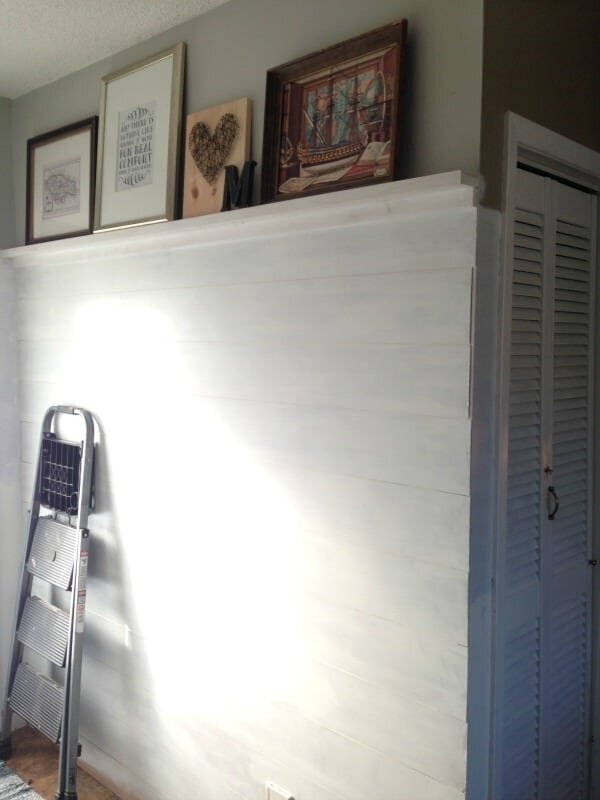
The first thing I did was paint the bottom part where the shiplap would go in white primer so that I didn’t have to compete with the taupe once the panels were put in.

DIY faux shiplap walls - The Learner Observer

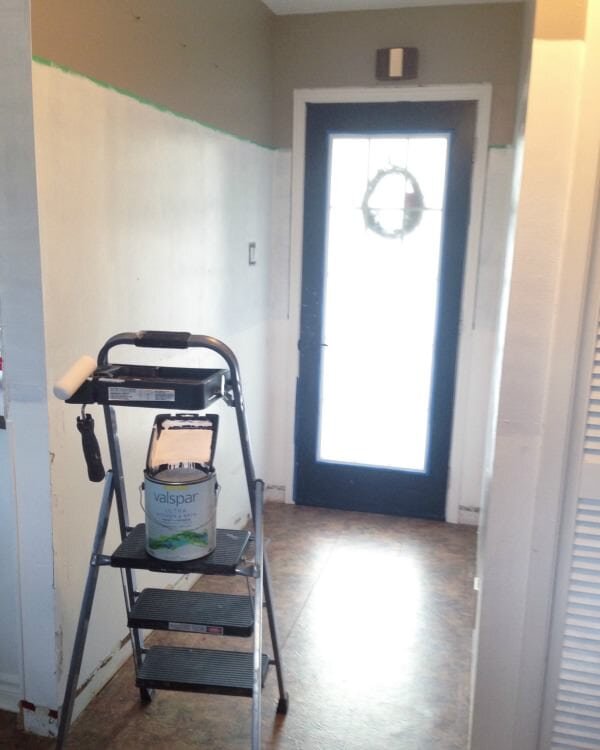
The top part got two coats of light grey paint (Dolphin Fin 790C-3 by Behr) and that included that crazy ugly doorbell box. The gold and brown were not working for me…

DIY faux shiplap walls - The Learner Observer

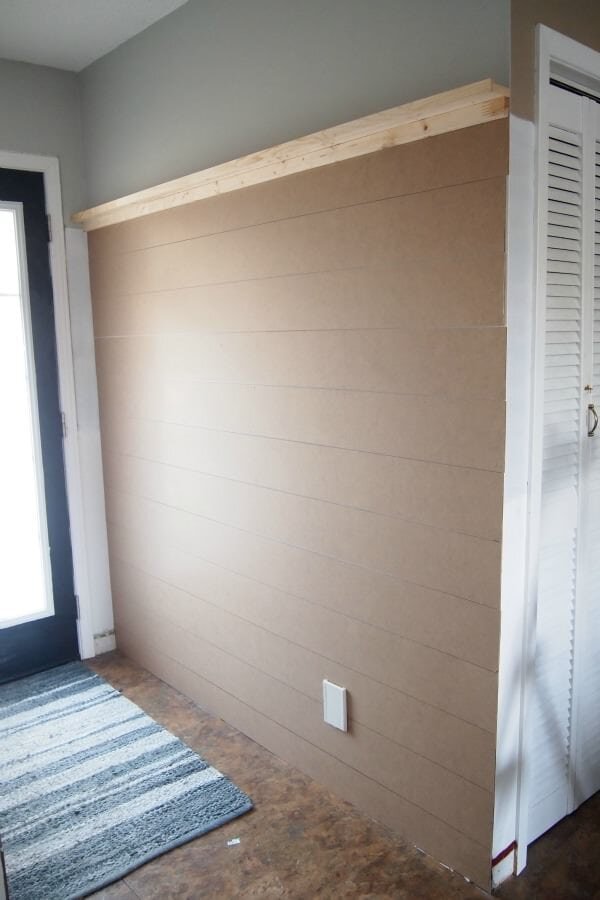
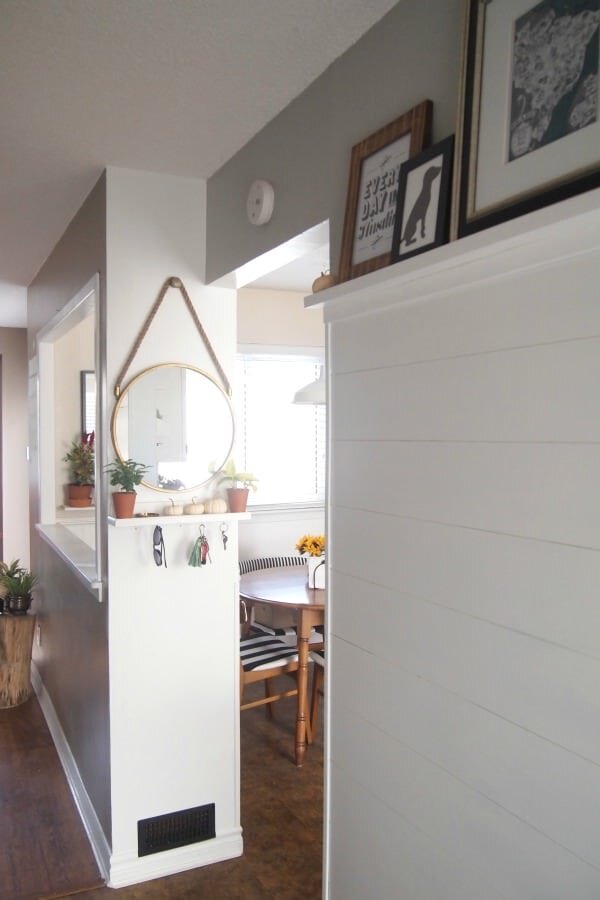
I headed to The Home Depot and got some 1/8″ particle board and one of their lovely staff members kindly cut 3 sheets of the stuff into 6″ strips. Since the panels are 8′ long, and my hallway is only about 6′, the job was made pretty easy. I used nickels as spacers and a some ‘No More Nails‘ for paneling and moulding so that the panels don’t warp over time, then primed everything. The picture ledge on top was made with some 1×3, 1×2 and 5/16×1-1/16 pieces, which were both nailed and screwed onto the wall for extra security.

use nickels as spacers for faux shiplap wall

DIY faux shiplap walls - The Learner Observer

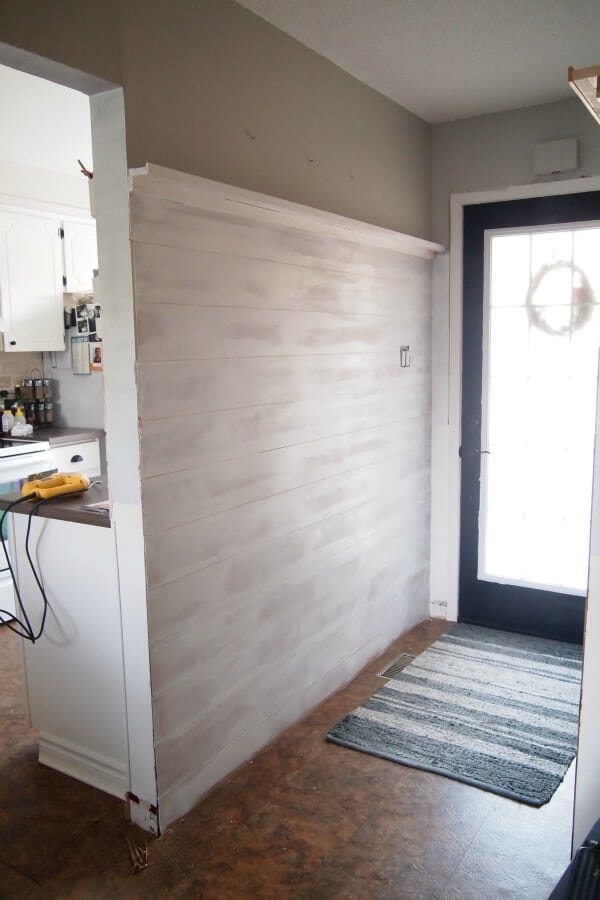
Once everything was installed, I put the baseboards back on and painted it all white (Falling Snow PPU18-07 by Behr). It’s pretty important to use a paintbrush to get in between the boards, but thankfully all it took was one coat. Hand cramps galore!

DIY faux shiplap walls - The Learner Observer

DIY faux shiplap walls - The Learner Observer

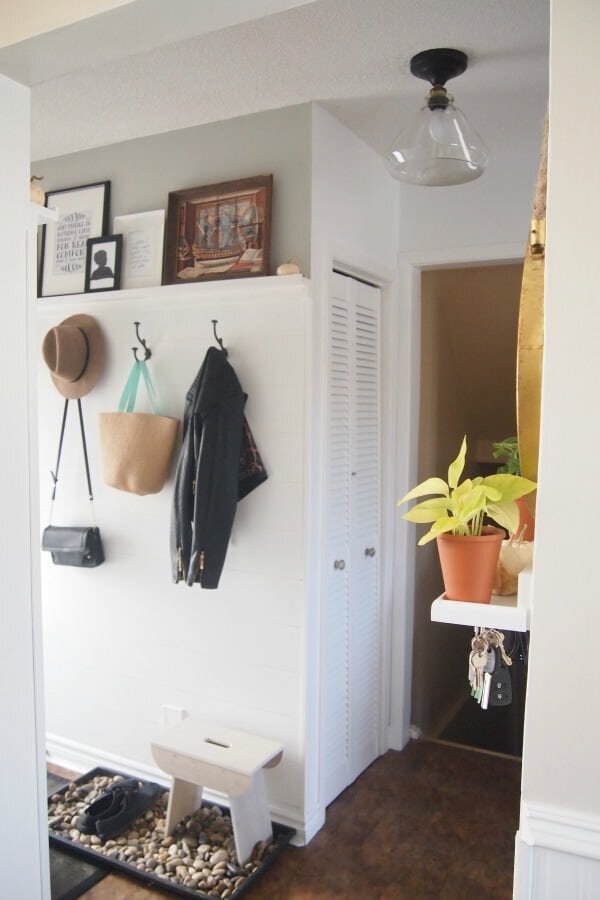
Now all that was left to be done was add some hooks, and I just ended up removing the hooks from the wooden piece they were previously on and spaced them a little farther apart on the wall. Once the kids are a little bigger, I might add some smaller hooks down low, but before doing all of that, I couldn’t help but start to plan out where the artwork would go on the rail. Priorities, right?

DIY faux shiplap walls - The Learner Observer

Entryway makeover with faux shiplap and a DIY picture ledge

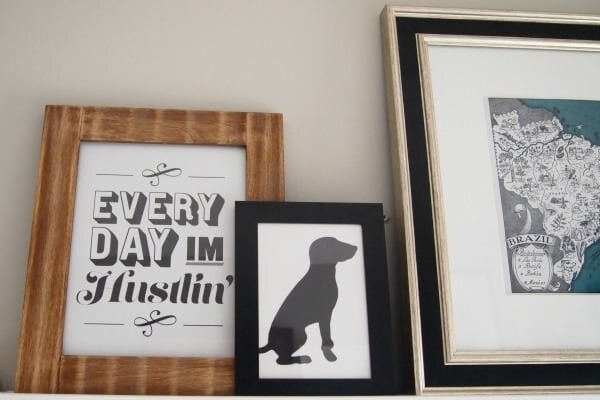
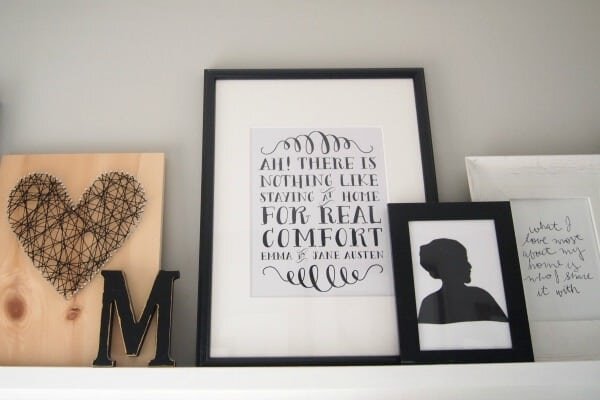
 The picture rail basically holds all of the art that used to be on the gallery wall around the TV. This is a MUCH better place for all of these frames, and I love that it’s so easy to change over artwork anytime I want. I already moved things around about 13 times before taking these pictures!

Entryway makeover with faux shiplap and a DIY picture ledge

Entryway makeover with faux shiplap and a DIY picture ledge

So now the pressing question remains: which light fixture did I choose? Parrot Uncle didn’t make my job easy, because there were truly SO many great options to choose from! Well given my love for black and brass, the fact that our front door is painted black on the inside, and that the look of the entry would now be quite informal with shiplapped walls and hooks, I chose number 5. I am in love with it, you guys! It’s THE perfect fixture for our space, understated enough that it doesn’t stand out too much, but still this little guy makes himself known.

Entryway makeover with faux shiplap and a DIY picture ledge

I opted for a regular LED lightbulb because the Edison bulbs just did not give enough light – and we tried about 3 of them! So, even though they’re gorgeous, for a front hallway we really had to go for something much brighter.

Entryway makeover with faux shiplap and a DIY picture ledge

One more change we made to the entry was getting rid of the chalkboard wall, which was basically the first thing people saw when coming in. Because I got rid of that huge mirror that was on the wall, I was missing the fact that we had a spot to do that final check before leaving the house. I found THE most perfect mirror to compliment the brass in the new light fixture, and made another small shelf to be custom fitted to the small wall and so we can stop using the countertop or the ledge on our half wall as a spot for odds and ends. This way we also keep a spot for keys, which is important since we got used to always putting car keys in the same spot as we come into the house. All I did was add some hooks to the bottom of the shelf – easy peasy!

Chalkboard wall before


Entryway makeover with faux shiplap and a DIY picture ledge - The Learner Observer

Entryway makeover with faux shiplap and a DIY picture ledge

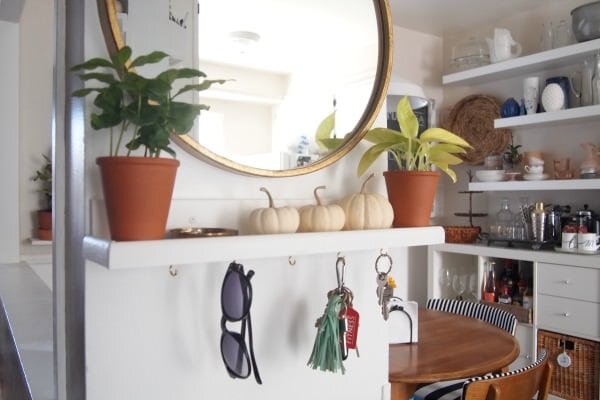
I also love this little wall. I love that it’s white now! I thought I would miss the black, but the space feels so much fresher and cleaner in white.

Entryway makeover with faux shiplap and a DIY picture ledge

So that concludes this insanely wordy post about a teeny tiny entryway! Here’s a quick before and after so you can see how this small space has changed.

Entryway makeover with DIY faux shiplap and a picture ledge - The Learner Observer

I really just want to mention one more thing, and this was by NO means something I was asked to do. Parrot Uncle was AMAZING to work with, and I would strongly recommend you look into them the next time you want an awesome light fixture (or cool bulbs and accessories) delivered right to your front door. The packaging was amazing, the people I dealt with were fantastic, and considering these come from the other side of the world, delivery was crazy fast. They honest to goodness did not ask me to say that, I just felt like I had to mention it because it’s true, and like I said at the beginning of the post, I gotta keep it real.

Alright, now I gotta get back to the nursery/bathroom reno/painting the living room! See you back here real soon, and have a great day!!

Written by Thalita - Visit Website

In: Decor, DIY, Sponsored · Tagged: decor, DIY, entryway, gallery wall, home, lighting, organizing, shiplap, white

join the club

You’ll Also Love

Everything You Need to Know About Planning IKEA Kitchen Cabinets
Make Tree Stump Tables Without Losing Your Mind
Fabric-Covered Storage Boxes – Because Twins Come With A LOT Of Stuff!

Comments

  1. Danica says

    October 27, 2015 at 5:30 pm

    Soooooooo amazing! Seriously! I love how you have the ledge for pictures. AND that wall from chalk paint to white! AHHH I really love all of it! Also, is Parrot Uncle Canadian? We all know I am going to need lights!

    Reply
    • Thalita says

      October 28, 2015 at 7:18 am

      Thanks, girl!!! I am SO glad I decided against shiplap all the way up and went for the picture rail, and also, I never thought I’d be so happy to see a chalkboard go! haha I loved it for a while, but the white just feels a million times brighter and better! Parrot Uncle isn’t Canadian, and their shipments all come from China, but they were really awesome to work with, regardless. I can send you a bit more info in an email :)

      Reply
  2. Anonymous says

    October 27, 2015 at 6:29 pm

    It looks amazing . You always accomplish what you have in mind. Such a great work for who is 29 weeks pregnant. Love it

    Reply
    • Thalita says

      October 28, 2015 at 7:28 am

      Thanks, mama!!

      Reply
  3. Julia at Home on 129 Acres says

    October 27, 2015 at 9:48 pm

    Okay. First, you’re crazy! How can you take on so many makeovers at one time?! And while pregnant?! With twins?! You guys are insane. But second, the insanity is paying off because great job. it’s looks awesome. And third, I love the light. That was my first choice, and I think it’s a perfect fit for your space.

    Reply
    • Thalita says

      October 28, 2015 at 7:31 am

      haha I’m not going to lie, there are moments when I feel like I have gone insane for taking all of this on, but with 2 on the way, it’s really now or never. There’s just no way we’ll be able to accomplish these things once the babies come, and I’m sure we won’t want to! Thanks so much, Julia! I’m insanely happy with the light fixture and how airy and light it is – both visually and physically!

      Reply
  4. vasantiago84 says

    October 28, 2015 at 10:55 am

    I love it!! Such a difference a small makeover can make..

    Honestly, I’m just as bad with multi-projecting, LOLOL.. I finally finished one..

    Reply
    • Thalita says

      October 28, 2015 at 5:24 pm

      Sometimes the small makeover pack the most punch! Also, this whole multi-tasking with all of the projects is so bad for my ORC project. I swear, this nursery is so not getting done!

      Reply
  5. Kristi says

    October 29, 2015 at 8:47 am

    LOVE, LOVE, LOVE everything about it!

    Reply
    • Thalita says

      October 29, 2015 at 12:39 pm

      Thanks, Kristi! Now to paint all of the walls white because I’m officially obsessed. Haha

      Reply
  6. Joann @ Woman In Real Life says

    November 25, 2015 at 6:22 pm

    I don’t blame you for wanting to get some projects out of the way! :) You did an amazing job on this and I love the lighting you chose!

    Reply
    • Thalita says

      December 6, 2015 at 5:29 pm

      Thanks so much, Joann!!

      Reply
  7. Jane @SustainMyCraftHabit says

    November 26, 2015 at 6:53 am

    So nice! Love the brightness and the picture shelves are fantastic. I can’t believe you’re doing all this pregnant with twins. You are amazing! Pinned your ideas for our hallway re-do!

    Reply
    • Thalita says

      December 6, 2015 at 5:30 pm

      When nesting kicks in, it knows no bounds, apparently! Haha Thanks so much for stopping by and pinning!!!

      Reply
  8. Anonymous says

    April 11, 2018 at 1:34 am

    Hi! I love the round mirror opposite your entryway. Where did you find it?

    Reply
    • Thalita says

      April 12, 2018 at 6:35 am

      I found this one at HomeSense (Home Goods in the U.S.) and I’ve seen similar at Target as well!

      Reply

Trackbacks

  1. The Learner Observer - Twin Nursery Reveal [Finally!] says:
    May 20, 2016 at 5:33 pm

    […] laugh because I really thought I could pull off a room makeover while renovating a bathroom, while shiplapping the entryway, and while being huge and pregnant with twins. Overachiever, much? (You can see the weeks I […]

    Reply

Leave a Reply Cancel reply

Your email address will not be published.

Next Post >

#TheLOBathReno Part 1: demolition!

Hey, I'm Thalita! Daydreamer, serial decorator, mama of twin boys, lover of thrift stores, fuelled by coffee! This is the space where I share my DIY triumphs and failures, as well as interior design inspiration and regular life stuff.

Categories

On the Blog

  • Decor
  • DIY
  • Lifestyle

Reader favourites

  • DIY Double Sliding Doors for under $150
  • DIY Cookbook Stand (Using Scrap Wood)
  • How to Create a Symmetrical Gallery Wall

join the club

trending now

  • DIY Double Sliding Doors for under $150
  • DIY Cookbook Stand (Using Scrap Wood)
  • 4 wayd to help keep pet hair off the bed for good! | TheLearnerObserver.com Clean comforter and pets. Is it possible to have both?
  • DIY Inexpensive Wood Countertop

Instagram

We wrapped up week 1 of 3 (haha...sure) of online We wrapped up week 1 of 3 (haha...sure) of online learning and we’re all losing it a little. Things that are helping: pretending that we’re in the Mystery Machine, headed for a campground with a mystery to solve! Jude says the camp counsellor is pretending to be a ghost while Luca was busy getting “Honey” into her sleeping bag for the night. And then a pirate showed up, so this story is really getting good 😂

@playmobil is honestly a life changer because the kids get to build AND use their imagination. It’s a win-win, and let’s face it, we could all use a little win these days.

How are you all coping with kids at home?
Why yes, this is exactly what my dining room table Why yes, this is exactly what my dining room table looks like right now. No, there aren’t markers, papers, toys, food, crumbs and tears on it. Nope. Nope. Nope. None of the above. Everything’s cool and calm over here, folks.

(If it’s not abundantly clear, I am joking.)
What does your Monday morning look like today? We’re over here prepping for online learning (note computer on dining room table) and I’m using our @playosmo to get our kids engaged in some math and language activities before we really get going. Every time I post about our Osmo, I’m asked: “do you really like it?” And my answer is always “YES!” I mean, just look at these kiddos. Jude is obsessed with the tangram and Luca loves sounding our words - he was trying to figure out whether to use ‘k’ or ‘c’ for ‘cat’ here. To them, they’re “playing”...but we all know what’s REALLY going on! #unboxingosmo #osmosocialclub
Well it would seem that I just CANNOT figure out r Well it would seem that I just CANNOT figure out reels, but I’m not letting that stop me. I made one showing you the materials and steps to make this super easy ornament storage so would you go watch it, pretty please?

I’ve been using this method of ornament storage for 7 years and it all started with a cardboard box, some red cups and a single layer. A few years later I upgraded the system to multiple layers, used foam board and white cups and voila! Scroll over to see what I mean.

Would you try this? It’s super easy and you can probably still go ahead and just use old cardboard and whatever cups you have on hand. It’s the best thing I ever did for my holiday decor!! Just make sure you use double sided tape or hot glue to attach the cups - loose cups are no bueno!

If you do this, show me, ok? I wanna see everyone put away their ornaments with no breakage! 🙌
Ready for lots of THIS over the next couple of wee Ready for lots of THIS over the next couple of weeks...but with a puppy in the middle of it all. We’re picking up Taco on Friday so prepare yourself for puppy pictures ALL over the place.

Also: I’ve been feeling uninspired lately and have taken a little break from both posting and consuming when it comes to social media. I’m trying to soak up the holiday magic, read things other than captions (as I write this that seems weird), and even writing more things down.

This time of year always makes me reflective - less because it’s the end of a calendar year and more because it’s my birthday in 9 days. Yes. It’s on the 25th. Yep. Christmas Day. No, seriously. Yeah, Christmas baby! I don’t mind it now, but I didn’t like it as a kid. Oh you know someone who also has a birthday on (or very close to) Christmas! Cool! <— that was just me reacting to like every single conversation ever about having a birthday on December 25th. 😂
I’m still thinking about these adorable little @ I’m still thinking about these adorable little @tubicenlighting lamps that you just touch to turn on and off. And this cutie little door all decked out with a smart doorbell and lock. And the beautiful blue kitchen by @remodelcanada.ca. And all of the vanities from @canaromatoronto. And this gorgeous hardwood flooring from @coswickcanada.ca.

Can you believe this was all under one roof? @improvecanada has 350 showrooms and it was so much fun seeing how many we could get to yesterday.

I’ll be sharing lots more about @improvecanada in the coming months, but if you’re curious and want to go see it for yourself, they’re open! You can call and book an appointment or even have a customer service rep help you make an appointment at showrooms suited to what you’re looking for. Pretty great, right?
#improvecanada # ad #makeitright
So I made a thing and I’m totally in love!! Now So I made a thing and I’m totally in love!! Now I just need to gather all of the boys for an adorable family photo. Christmas miracle, maybe?

I made these sweaters for all of us last weekend using my @officialcricut Joy and now I may need to start personalizing a LOT more shirts around here! It was my first time using infusible ink and I love how the sweaters stays super soft! I may just be wearing this for the rest of the year!

O.S. If it wasn’t clear, our last name is Murray 😆

Have you made matching Christmas sweaters? What would be on yours if you did? # ad #cricutmade
Are you crafty? Do you know someone who is? Or may Are you crafty? Do you know someone who is? Or maybe you’re like me and you like to think you’re crafty but lack the patience to take out a whole bunch of things to make one tiny craft? Well then I have the thing for you. Meet the @officialcricut Joy! It’s tiny but mighty, and you can just have it casually sitting on a shelf waiting to be used when inspiration strikes because it takes up basically no room at all! I made these labels using mine, and you can swipe to see another easy project you can make with a Cricut Joy. It’s the perfect little gift! I even wrote a blog post about why I think so. I’ll share another Cricut project with you later this week!! # ad #cricutmade
Can you believe this room was completed two years Can you believe this room was completed two years ago? And I still love it as much today as I did then. And I still believe that my kids can have a fun, comforting space even if they don’t get to decorate it themselves with superhero bedding and Lego everywhere! But ALSO, I would never judge you if you’re that parent who does let your kids decorate with all the primary colours because you do you, boo and if it makes you and your kids happy, I say do the dang thing!!!

Ok that is all. Have a wonderful judgement-free day!
Put the finishing touches on our front porch this Put the finishing touches on our front porch this past weekend and I gotta say, this might be my favourite one yet.

Truth: I actually really dislike the exterior of our house. With exception of the front door, it’s pretty darn ugly. The 1970’s red brick mixed with buttercream yellow and burgundy siding are like the WORST combo ever. Add in little bits of the foundation which is painted blue and the concrete isn’t pretty either.

BUT those things don’t stop me from prettying up this little space anyway. Because for like 99% of us, making a home takes time. Renovating takes time. Even if TV shows and social media lead us to believe otherwise.

Now if you want to see some front porches full of personality and holiday cheer, all by Canadian ladies who get that nothing happens overnight, do I have a great lineup for you! Go check them out! #acanadianchristmasporch
@markovadesign
@vinyetetc
@onehouse2barns
@bethanythislittleestate
@thesuburbanhome
@celineshouseonramsey
@alysia.jantzi
@unclutteredhouse

Connect

join the club

  • Privacy Policy
  • Press

Copyright © 2021 The Learner Observer · Theme by 17th Avenue